Build 02: Connect Your Database
Connect your site to a live database using Google Cloud SQL, Google VPC connector, and Google Cloud Functions—unlock real-time features and data-driven functionality.
🔗 Why This Matters
This week, our key goal is to connect our database to our website and get it to work in production. That will allow us to establish a framework for site + database—and unlock many other features that rely on this connection.
We’ll use a mix of cloud tools (Google Cloud SQL, Google VPC Connector, Google Cloud Functions) and a touch of Cursor to make it happen.
🛠️ Tools We’ll Use
- Google Cloud SQL: Our hosted relational database.
- Google VPC Connector: Lets Cloud Functions access your private Cloud SQL instance.
- Google Cloud Functions: Used to define and deploy our API endpoints.
- Cursor AI: Used to scaffold and tweak the function files.
1. Choose the Right Database: Cloud SQL vs. BigQuery Google Cloud SQL
I come from an analytics background, so I naturally reached for BigQuery. But for a transactional web app, we need a different tool.
🧠 BigQuery vs. Cloud SQL
| Feature | BigQuery | Cloud SQL |
|---|---|---|
| Type | Serverless Data Warehouse | Managed Relational Database |
| Best for | Analytics, OLAP (large queries) | Transactions, OLTP (frequent updates) |
| Data Volume | Petabyte-scale | Up to 64TB per instance (Postgres) |
| Performance | Optimized for large scans | Optimized for low-latency reads/writes |
| Concurrency | High | Moderate, depending on tier |
| Use Case Example | Analyzing user behavior trends | Powering a web app backend |
| Integration with Cloud Functions | Via BigQuery API | Via direct connection (Google VPC + socket) |
TLDR: If your site needs to **read/write fast and often**, Cloud SQL is your friend.
2. Set Up Your Cloud SQL Instance Google Cloud SQL
I used PostgreSQL for this. Here are the key values you’ll need to save:
DB_NAME=your_database_name
DB_USER=your_username
DB_PASSWORD=your_password
INSTANCE_CONNECTION_NAME=project:region:instance
These will be passed into your Cloud Function.
3. Set Up the VPC Connector Google VPC Connector
A VPC Connector allows our Cloud Function to securely access our Cloud SQL database as if it were inside the same private network
- Set this up in the same region as your DB.
- Save the connector name (you’ll reference it when deploying your function).
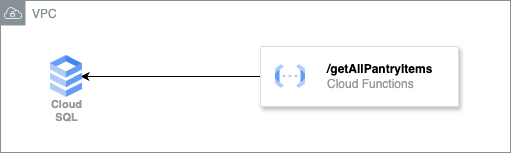
4. Define Your API Endpoint Cursor AI Google Cloud Functions
With help from Cursor AI, we scaffolded a simple index.js file that creates an API to fetch data from the database.
const { Pool } = require('pg');

const pool = new Pool({
  user: \`\${process.env.DB_USER}\`,
  host: \`/cloudsql/\${process.env.INSTANCE_CONNECTION_NAME}\`,
  database: \`\${process.env.DB_NAME}\`,
  password: \`\${process.env.DB_PASSWORD}\`,
});

exports.getAllPantryItems = async (req, res) => {
  try {
    const result = await pool.query('SELECT * FROM pantry ORDER BY ingredient');
    res.status(200).json(result.rows);
  } catch (err) {
    console.error('Database error:', err);
    res.status(500).send('Internal Server Error');
  }
};
5. Deploy Your Function to Google Cloud Google Cloud Functions
We use Google Cloud Functions to host our API endpoints. It’s serverless, scalable, and integrates well with Cloud SQL.
Run the following in terminal to deploy:
gcloud functions deploy getAllPantryItems \
  --runtime nodejs20 \
  --trigger-http \
  --allow-unauthenticated \
  --region us-central1 \
  --set-env-vars DB_USER=xxx,DB_PASSWORD=xxx,DB_NAME=xxx,INSTANCE_CONNECTION_NAME=xxx \
  --vpc-connector=xxx
6. Connect Your Web App to the API Google Cloud SQL Google Cloud Functions
To make your production site connect to the same database, pass the same variables into your frontend host.
If you’re using Cloudflare Pages, go to:
Compute (Wokers) → Select Page → View Details → Build Settings → Environment Variables → Add your keys there

🎯 Wrap-Up
You now have a working stack:
Google Cloud SQL ↔️ Google Cloud Function ↔️ Web App
You’re not just building a pretty site—you’re laying the groundwork for real features like user accounts, pantry tools, and AI meal planning.
Onward!